
几个月前,我将 Pathfinder 演示应用程序移植到 WebVR。这是一次有趣的经历,我感觉自己学到了很多关于将 WebGL 应用程序移植到 WebVR 的知识,这些知识对大家来说都很有用,特别是那些来自非 Web 编程背景的人们。
Pathfinder 是一个基于 GPU 的 Rust 字体光栅化器,它带有一个演示应用程序,该应用程序在服务器端运行 Rust 代码,但在 TypeScript 网站中的 WebGL 中完成所有 GPU 工作。
我们有一个 3D 演示,展示了 Mozilla 纪念碑 的表示形式,作为演示 3D 中文本光栅化的方式。我希望将它转换为一个 WebVR 应用程序,它可以让你通过移动头部而不是使用方向键来查看纪念碑。
我开始着手解决这个问题,对 OpenGL 和 WebGL 有比较好的理解,但几乎没有 VR 或 WebVR 背景。三年前我写过一个 Android Cardboard 应用程序,仅此而已。
我希望这篇文章对来自类似背景的其他人有所帮助。
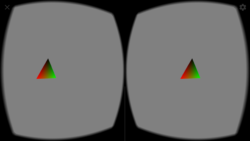
在 WebVR 中运行的转换后的 三角形演示
什么是 WebVR?
WebVR 是一组 API,用于在 Web 上编写 VR 应用程序。它允许我们请求跳转到 VR 模式,此时我们可以直接渲染内容到 VR 显示器的眼睛,而不是渲染到显示器内的平面浏览器。当用户使用 Cardboard 或 Daydream 等设备时,这些设备用普通手机代替 VR 显示器,用户将手机放入头盔中,此时就会出现这种模式。
WebVR API 有助于过渡到/退出 VR 模式、获取姿态信息、在 VR 中渲染以及处理设备输入。其中一些正在新的 WebXR 设备 API 规范 的工作中得到改进。
我是否需要任何设备才能使用 WebVR?
理想情况下,好的 VR 设备将使你更容易测试正在进行的工作,但根据你需要的分辨率,Daydream 或 Cardboard(使用手机放在头盔外壳中)就足够了。你甚至可以在没有头盔外壳的情况下测试内容,尽管内容看起来会很奇怪和扭曲。
对于本地测试,Chrome 拥有一个非常有用的 WebVR API 模拟扩展。你可以使用其中的开发者工具面板来调整姿态,并且可以得到眼睛看到的非扭曲显示。
Firefox 支持 WebVR,如果你 启用一些标志,Chrome Canary 也支持它。还有一个 polyfill,应该适用于更多浏览器。
它是如何在幕后工作的?
我认为不理解这部分是我开始时遇到很多困惑和错误的根源。API 的核心基本上是“渲染内容到画布,然后神奇的事情发生了”,我一直搞不懂这种魔法是如何工作的。
本质上,我们应该完成很多工作,然后浏览器(或 polyfill)会做额外的工作。
一旦我们进入 VR 模式,每当设备请求帧时,就会触发一个回调。在这个回调中,我们可以访问姿态信息。
使用这些姿态信息,我们可以确定每只眼睛应该看到什么,并将这些信息以某种形式提供给 WebVR API。
WebVR API 期望我们把每只眼睛的视图渲染到一个水平分割的画布上(这个画布会在我们初始化时传递给 API)。
这就是我们这边要做的事情,浏览器(或 polyfill)会处理剩下的。它将我们渲染的画布用作纹理,并且对于每只眼睛,它会将渲染的一半扭曲,以便与你的设备中使用的透镜配合使用。例如,Daydream 和 Cardboard 的扭曲遵循 polyfill 中的这段代码。
需要注意的是,作为应用程序开发人员,我们不必担心这一点——WebVR API 正在为我们处理它!我们需要将每只眼睛的非扭曲视图渲染到画布上——左视图在左半部分,右视图在右半部分,浏览器会处理剩下的!
移植 WebGL 应用程序
我将尝试保持这种自包含性,但是我会在一开始就提到,可以在 webvr.info 和 MDN 中找到一些非常好的学习这些内容的资源。 webvr.info 有很多很棒的 示例,如果你像我一样,通过查看代码并尝试它来学习效果更好。
进入 VR 模式
首先,我们需要能够访问 VR 显示器并进入 VR 模式。
let vrDisplay;
navigator.getVRDisplays().then(displays => {
    if (displays.length === 0) {
        return;
    }
    vrDisplay = displays[displays.length - 1];

    // optional, but recommended
    vrDisplay.depthNear = /* near clip plane distance */;
    vrDisplay.depthFar = /* far clip plane distance */;
}
我们需要添加一个事件处理程序,用于处理进入/退出 VR 的情况
let canvas = document.getElementById(/* canvas id */);
let inVR = false;

window.addEventListener('vrdisplaypresentchange', () => {
  // no VR display, exit
  if (vrDisplay == null)
      return;

  // are we entering or exiting VR?
  if (vrDisplay.isPresenting) {
    // We should make our canvas the size expected
    // by WebVR
    const eye = vrDisplay.getEyeParameters("left");
    // multiply by two since we're rendering both eyes side
    // by side
    canvas.width = eye.renderWidth * 2;
    canvas.height = eye.renderHeight;

    const vrCallback = () => {
        if (vrDisplay == null || !inVR) {
            return;
        }
        // reregister callback if we're still in VR
        vrDisplay.requestAnimationFrame(vrCallback);

        // render scene
        render();
    };
    // register callback
    vrDisplay.requestAnimationFrame(vrCallback);
  } else {
    inVR = false;
    // resize canvas to regular non-VR size if necessary
  }
});
并且,要进入 VR 本身
if (vrDisplay != null) {
    inVR = true;
    // hand the canvas to the WebVR API
    vrDisplay.requestPresent([{ source: canvas }]);

    // requestPresent() will request permission to enter VR mode,
    // and once the user has done this our `vrdisplaypresentchange`
    // callback will be triggered
}
在 VR 中渲染
嗯,我们已经进入了 VR,现在怎么办?在上面的代码片段中,我们有一个 render() 调用,它完成大部分的繁重工作。
由于我们从现有的 WebGL 应用程序开始,因此我们已经拥有类似这样的函数。
let width = canvas.width;
let height = canvas.height;

function render() {
    let gl = canvas.getContext("gl");
    gl.viewport(0, 0, width, height);
    gl.clearColor(/* .. */);
    gl.clear(gl.COLOR_BUFFER_BIT | gl.DEPTH_BUFFER_BIT);

    gl.useProgram(program);
    gl.bindBuffer(/* .. */);
    // ...
    let uProjection = gl.getUniformLocation(program, "uProjection");
    let uModelView = gl.getUniformLocation(program, "uModelview");
    gl.uniformMatrix4fv(uProjection, false, /* .. */);
    gl.uniformMatrix4fv(uModelView, false, /* .. */);
    // set more parameters
    // run gl.drawElements()
}
所以首先,我们需要进一步拆分它,以处理渲染两只眼睛
<br />// entry point for WebVR, called by vrCallback()
function renderVR() {
    let gl = canvas.getContext("gl");
    // set clearColor and call gl.clear()
    clear(gl);

    renderEye(true);
    renderEye(false);
    vrDisplay.submitFrame(); // Send the rendered frame over to the VR display
}

// entry point for non-WebVR rendering
// called by whatever mechanism (likely keyboard/mouse events)
// you used before to trigger redraws
function render() {
    let gl = canvas.getContext("gl");
    // set clearColor and call gl.clear()
    clear(gl);
    renderSceneOnce();
}

function renderEye(isLeft) {
    // choose which half of the canvas to draw on
    if (isLeft) {
        gl.viewport(0, 0, width / 2, height);
    } else {
        gl.viewport(width / 2, 0, width / 2, height);
    }
    renderSceneOnce();
}

function renderSceneOnce() {
    // the actual GL program and draw calls go here
}
这看起来是一个不错的进步,但是请注意,我们渲染到两只眼睛的内容是相同的,并且根本没有处理头部移动。
为了实现这一点,我们需要使用 WebVR 从 VRFrameData 对象提供的透视矩阵和视图矩阵。
该 VRFrameData 对象包含一个 pose 成员,其中包含所有头部姿态信息(其位置、方向,甚至对于支持这些信息的设备来说,还有速度和加速度)。但是,为了在渲染时正确定位相机,VRFrameData 提供了我们可以直接使用的投影矩阵和视图矩阵。
我们可以这样操作
let frameData = new VRFrameData();
vrDisplay.getFrameData(frameData);

// use frameData.leftViewMatrix / framedata.leftProjectionMatrix
// for the left eye, and
// frameData.rightViewMatrix / framedata.rightProjectionMatrix for the right
在图形学中,我们经常发现自己在处理模型矩阵、视图矩阵和投影矩阵。模型矩阵定义了我们希望渲染的对象在我们空间中的坐标,视图矩阵定义了相机空间和世界空间之间的变换,而投影矩阵处理剪裁空间和相机空间之间的变换(也可能处理透视)。有时我们会处理这些矩阵的组合,例如“模型视图”矩阵。
你可以在 cubesea 代码 中看到这些矩阵的使用,该代码来自 webvr.info 的立体渲染示例。
我们的应用程序很可能已经拥有模型/视图/投影矩阵的概念。如果没有,我们可以在我们的 顶点着色器 中使用视图矩阵预乘我们的位置。
所以现在我们的代码看起来像这样
// entry point for non-WebVR rendering
// called by whatever mechanism (likely keyboard/mouse events)
// we used before to trigger redraws
function render() {
    let gl = canvas.getContext("gl");
    // set clearColor and call gl.clear()
    clear(gl);
    let projection = /*
        calculate projection using something
        like glmatrix.mat4.perspective()
        (we should be doing this already in the normal WebGL app)
    */;
    let view = /*
        use our view matrix if we have one,
        or an identity matrix
    */;
    renderSceneOnce(projection, view);
}

function renderEye(isLeft) {
    // choose which half of the canvas to draw on
    let projection, view;
    let frameData = new VRFrameData();
    vrDisplay.getFrameData(frameData);
    if (isLeft) {
        gl.viewport(0, 0, width / 2, height);
        projection = frameData.leftProjectionMatrix;
        view = frameData.leftViewMatrix;
    } else {
        gl.viewport(width / 2, 0, width / 2, height);
        projection = frameData.rightProjectionMatrix;
        view = frameData.rightViewMatrix;
    }
    renderSceneOnce(projection, view);
}

function renderSceneOnce(projection, view) {
    let model = /* obtain model matrix if we have one */;
    let modelview = glmatrix.mat4.create();
    glmatrix.mat4.mul(modelview, view, model);

    gl.useProgram(program);
    gl.bindBuffer(/* .. */);
    // ...

    let uProjection = gl.getUniformLocation(program, "uProjection");
    let uModelView = gl.getUniformLocation(program, "uModelview");
    gl.uniformMatrix4fv(uProjection, false, projection);
    gl.uniformMatrix4fv(uModelView, false, modelview);
    // set more parameters
    // run gl.drawElements()
}
这就够了!现在移动头部应该会触发场景中的移动,以匹配它!你可以在这个 演示应用程序 中看到代码的作用,它采用了一个 旋转三角形 WebGL 应用程序 并将其转换为一个 支持 WebVR 的三角形查看应用程序,使用的是这篇博文中介绍的技术。
如果我们还有其他输入,我们可能需要使用 Gamepad API 来设计一个适合典型 VR 控制器使用的良好 VR 界面,但这超出了本文的范围。
关于 Manish Goregaokar
Manish 在 Mozilla 开发实验性的 Servo 浏览器,并且在 Rust 社区中非常活跃