
Mozilla Research 的机器学习团队继续致力于开发自动语音识别引擎,作为 DeepSpeech 项目 的一部分,该项目旨在使语音技术和训练模型对开发者开放。我们一直在努力提高开源语音识别引擎的性能和易用性。即将发布的 0.2 版本将包含一个备受期待的功能:在录制音频时进行实时语音识别。这篇文章介绍了我们如何改变 STT 引擎的架构来实现这一点,从而实现实时转录性能。很快,您将能够以至少与音频输入相同的速度转录音频。
当将神经网络应用于音频或文本等时序数据时,捕捉随着时间推移而出现的模式非常重要。循环神经网络 (RNN) 是一种“记住”的神经网络——它们不仅将数据中的下一个元素作为输入,还将随时间推移而演变的状态作为输入,并使用此状态来捕捉时间相关的模式。有时,您可能还想捕捉依赖于未来数据的模式。解决此问题的其中一种方法是使用两个 RNN,一个向前推进时间,另一个向后推进时间,从数据的最后一个元素开始,一直到第一个元素。您可以在 Chris Olah 的这篇文章 中了解更多有关 RNN(以及 DeepSpeech 中使用的特定 RNN 类型)的信息。
使用双向 RNN
DeepSpeech 的当前版本 (以前在 Hacks 上介绍过) 使用了用 TensorFlow 实现的双向 RNN,这意味着它需要先获得整个输入才能开始执行任何有用的工作。改进这种情况的一种方法是实现流式模型:在数据到达时分块执行工作,这样当输入结束时,模型已经开始处理它,并且可以更快地给出结果。您也可以尝试查看输入过程中途的局部结果。

此动画展示了数据如何在网络中流动。数据从音频输入流向特征计算,穿过三个全连接层。然后它穿过双向 RNN 层,最后穿过最终的全连接层,在此对单个时间步进行预测。
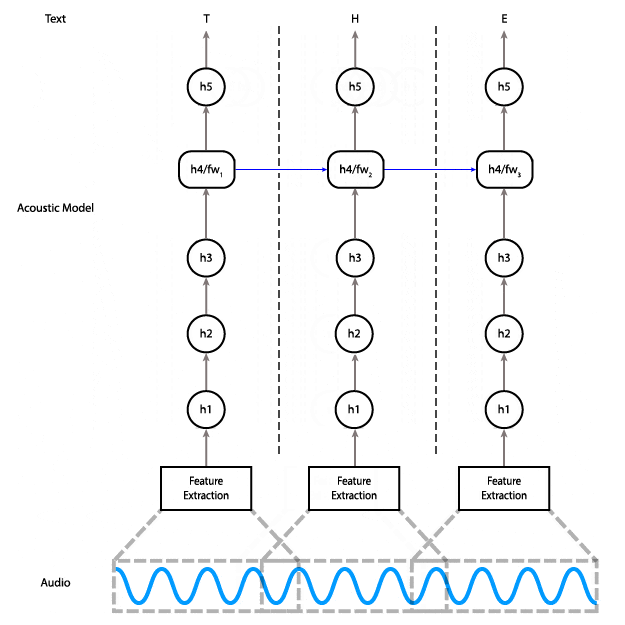
要做到这一点,您需要有一个模型,让您能够分块执行工作。以下是当前模型的图表,展示了数据在其中的流动方式。
如您所见,在双向 RNN 层中,需要最后一个步骤的数据才能计算倒数第二个步骤,而倒数第二个步骤又是计算倒数第三个步骤所必需的,依此类推。这些是图中从右到左的红色箭头。
我们可以在此模型中实现部分流式传输,方法是在数据输入时一直计算到第三层。此方法的问题在于,它在延迟方面不会给我们带来太多好处:第四层和第五层占模型计算成本的近一半。
使用单向 RNN 进行流式传输
相反,我们可以用单向层替换双向层,单向层不依赖于未来时间步。这样一来,我们就可以在获得足够的音频输入后,一直计算到最后一层。
使用单向模型,您可以分段输入,而不是一次性输入整个输入并获取整个输出。这意味着,您可以一次输入 100 毫秒的音频,立即获取这些输出,并保存最终状态,以便将其用作下一段 100 毫秒音频的初始状态。
使用单向 RNN 的替代架构,其中每个时间步只依赖于该时间步的输入和前一步的状态。
以下是创建推理图的代码,该图可以跟踪每个输入窗口之间的状态
import tensorflow as tf

def create_inference_graph(batch_size=1, n_steps=16, n_features=26, width=64):
    input_ph = tf.placeholder(dtype=tf.float32,
                              shape=[batch_size, n_steps, n_features],
                              name='input')
    sequence_lengths = tf.placeholder(dtype=tf.int32,
                                      shape=[batch_size],
                                      name='input_lengths')
    previous_state_c = tf.get_variable(dtype=tf.float32,
                                       shape=[batch_size, width],
                                       name='previous_state_c')
    previous_state_h = tf.get_variable(dtype=tf.float32,
                                       shape=[batch_size, width],
                                       name='previous_state_h')
    previous_state = tf.contrib.rnn.LSTMStateTuple(previous_state_c, previous_state_h)

    # Transpose from batch major to time major
    input_ = tf.transpose(input_ph, [1, 0, 2])

    # Flatten time and batch dimensions for feed forward layers
    input_ = tf.reshape(input_, [batch_size*n_steps, n_features])

    # Three ReLU hidden layers
    layer1 = tf.contrib.layers.fully_connected(input_, width)
    layer2 = tf.contrib.layers.fully_connected(layer1, width)
    layer3 = tf.contrib.layers.fully_connected(layer2, width)

    # Unidirectional LSTM
    rnn_cell = tf.contrib.rnn.LSTMBlockFusedCell(width)
    rnn, new_state = rnn_cell(layer3, initial_state=previous_state)
    new_state_c, new_state_h = new_state

    # Final hidden layer
    layer5 = tf.contrib.layers.fully_connected(rnn, width)

    # Output layer
    output = tf.contrib.layers.fully_connected(layer5, ALPHABET_SIZE+1, activation_fn=None)

    # Automatically update previous state with new state
    state_update_ops = [
        tf.assign(previous_state_c, new_state_c),
        tf.assign(previous_state_h, new_state_h)
    ]
    with tf.control_dependencies(state_update_ops):
        logits = tf.identity(logits, name='logits')

    # Create state initialization operations
    zero_state = tf.zeros([batch_size, n_cell_dim], tf.float32)
    initialize_c = tf.assign(previous_state_c, zero_state)
    initialize_h = tf.assign(previous_state_h, zero_state)
    initialize_state = tf.group(initialize_c, initialize_h, name='initialize_state')

    return {
        'inputs': {
            'input': input_ph,
            'input_lengths': sequence_lengths,
        },
        'outputs': {
            'output': logits,
            'initialize_state': initialize_state,
        }
    }
由上述代码创建的图有两个输入和两个输出。输入是序列及其长度。输出是 logits 和一个特殊的“initialize_state”节点,需要在新序列开始时运行。冻结图时,请确保不要冻结状态变量 previous_state_h 和 previous_state_c。
以下是冻结图的代码
from tensorflow.python.tools import freeze_graph

freeze_graph.freeze_graph_with_def_protos(
        input_graph_def=session.graph_def,
        input_saver_def=saver.as_saver_def(),
        input_checkpoint=checkpoint_path,
        output_node_names='logits,initialize_state',
        restore_op_name=None,
        filename_tensor_name=None,
        output_graph=output_graph_path,
        initializer_nodes='',
        variable_names_blacklist='previous_state_c,previous_state_h')
通过对模型进行这些更改,我们可以在客户端使用以下方法
- 运行“initialize_state”节点。
- 积累音频样本,直到有足够的样本可以输入到模型中(本例中为 16 个时间步,或 320 毫秒)。
- 通过模型馈送,将输出积累在某个地方。
- 重复步骤 2 和 3,直到数据结束。
在此向读者介绍数百行客户端代码毫无意义,但如果您感兴趣,它们都已获得 MPL 2.0 许可,并已在 GitHub 上提供。实际上,我们有两个不同的实现,一个是用 Python 编写的,我们用它来生成测试报告,另一个是用 C++ 编写的,它位于我们的官方客户端 API 后面。
性能改进
这对我们的 STT 引擎意味着什么?以下是与我们当前的稳定版本相比的一些数字
- 模型大小从 468MB 减少到 180MB
- 转录时间:笔记本电脑 CPU 上的 3 秒文件,从 9 秒减少到 1.5 秒
- 峰值堆使用量从 4GB 减少到 20MB(模型现在是内存映射的)
- 总堆分配量从 12GB 减少到 264MB
对我来说,最重要的是我们现在比实时速度更快,并且没有使用 GPU,这与流式推理一起,开辟了许多新的使用可能性,例如对广播节目、Twitch 直播和主题演讲进行实时字幕;家庭自动化;基于语音的 UI;等等。如果您想在下一个项目中集成语音识别,请考虑使用我们的引擎!
以下是一个小的 Python 程序,演示了如何使用 libSoX 从麦克风录制音频,并在录制音频时将其馈送到引擎中。
import argparse
import deepspeech as ds
import numpy as np
import shlex
import subprocess
import sys

parser = argparse.ArgumentParser(description='DeepSpeech speech-to-text from microphone')
parser.add_argument('--model', required=True,
                    help='Path to the model (protocol buffer binary file)')
parser.add_argument('--alphabet', required=True,
                    help='Path to the configuration file specifying the alphabet used by the network')
parser.add_argument('--lm', nargs='?',
                    help='Path to the language model binary file')
parser.add_argument('--trie', nargs='?',
                    help='Path to the language model trie file created with native_client/generate_trie')
args = parser.parse_args()

LM_WEIGHT = 1.50
VALID_WORD_COUNT_WEIGHT = 2.25
N_FEATURES = 26
N_CONTEXT = 9
BEAM_WIDTH = 512

print('Initializing model...')

model = ds.Model(args.model, N_FEATURES, N_CONTEXT, args.alphabet, BEAM_WIDTH)
if args.lm and args.trie:
    model.enableDecoderWithLM(args.alphabet,
                              args.lm,
                              args.trie,
                              LM_WEIGHT,
                              VALID_WORD_COUNT_WEIGHT)
sctx = model.setupStream()

subproc = subprocess.Popen(shlex.split('rec -q -V0 -e signed -L -c 1 -b 16 -r 16k -t raw - gain -2'),
                           stdout=subprocess.PIPE,
                           bufsize=0)
print('You can start speaking now. Press Control-C to stop recording.')

try:
    while True:
        data = subproc.stdout.read(512)
        model.feedAudioContent(sctx, np.frombuffer(data, np.int16))
except KeyboardInterrupt:
    print('Transcription:', model.finishStream(sctx))
    subproc.terminate()
    subproc.wait()
最后,如果您想为 DeepSpeech 项目本身做出贡献,我们有很多机会。代码库是用 Python 和 C++ 编写的,我们很乐意添加 iOS 和 Windows 支持,例如。您可以通过我们的 IRC 频道 或我们的 Discourse 论坛 与我们联系。
关于 Reuben Morais
Reuben Morais 是 Mozilla 机器学习团队的高级研究工程师。他目前专注于缩短机器学习研究与现实世界应用之间的差距,为用户带来隐私保护语音技术。
5 条评论